Whether you have just received your commission or want to upgrade your notarial toolkit, a Washington notary seal embosser can add a touch of professionalism and security to every document you notarize. Learning to use your embosser the right way is straightforward, but there are a few best practices you should follow to create crisp, clear impressions every time. Below, you will find everything you need to know about selecting the proper paper, positioning your seal, maintaining the device, and more. By the end, you will feel confident using your Washington notary seal embosser like a pro.
Understand Your Washington Notary Seal Embosser
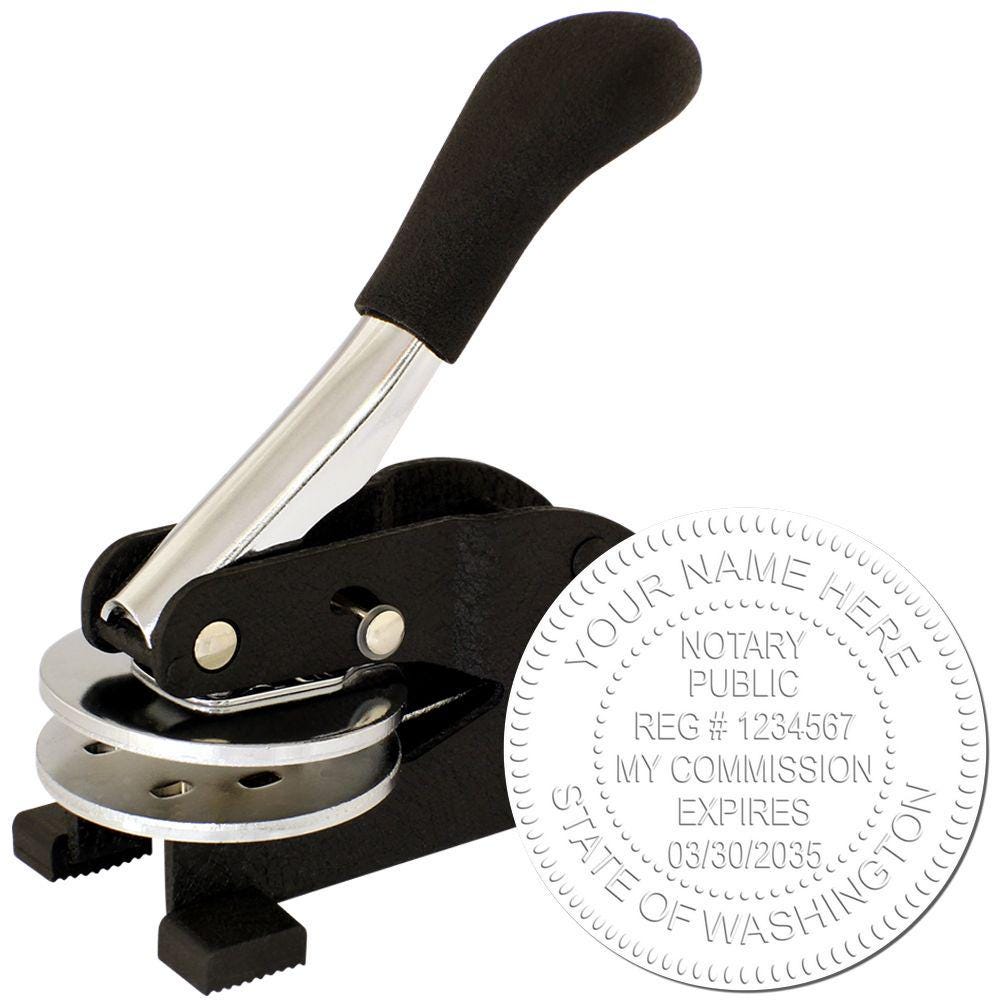
Before you dive into the details of when and where to emboss, it helps to know precisely how your Washington notary seal embosser works. An embosser uses a pair of plates (or dies) to press a raised impression onto the paper. One plate contains the raised design, and the other plate holds the corresponding negative image. When pressure is applied, these two plates meet and create a three-dimensional imprint that includes the notary’s name, commission number, and other essential details required by state regulations.
Components of an Embosser
- Fixed or Handheld Design: Some notary embossers are heavy-duty devices that you place on a desk or table. Others are handheld, offering more portability. Both styles serve the same core purpose.
- Upper Die: Contains the design elements that press down on your paper, forming the raised impression.
- Lower Die: Receives the impression from the top plate. When pressed together, they align to emboss your notarial details clearly.
- Lever or Handle: Applying steady force to the lever or handle is what makes the embossing action happen.
- Orientation Mark: Many embossers have a small mark or guide that helps you line up your seal correctly, avoiding crooked or partially embossed impressions.
Familiarizing yourself with these components will help ensure you use your notary seal embosser correctly and confidently.
Choose Suitable Paper and Position
Not all paper is created equal when it comes to embossing. You should also be mindful of where you place the seal on the document. Proper paper weight and correct alignment help your seal stand out, make a professional impression, and meet Washington’s notarial regulations.
Paper Weight and Thickness
While embossers can handle various paper weights, excessively thick cardstock can interfere with creating a clean impression. On the other hand, extremely thin paper may tear under the embosser’s pressure. Look for:
- Standard Letter Paper (20–24 lb. weight): Commonly used in offices and suitable for most notarial services.
- Premium Bond Paper (24–28 lb. weight): Slightly thicker than typical printer paper, offers a crisper imprint without tearing.
Test a small portion of your document if you are unsure whether the paper thickness is too great or too flimsy.
Placement on the Document
Washington notarial regulations often specify where your seal can or should appear on official documents. Keep the following suggestions in mind:
- Stay Clear of Text: Avoid placing the seal over printed words or signatures. Doing so may obscure important information.
- Leave Ample Margins: If your notary certificate or signature block is near the bottom of the page, ensure there is enough empty space to accommodate the embosser’s dimensions.
- Avoid Page Edges: Placing your seal too close to the edge might cause incomplete impressions, since the embosser may not achieve even pressure along the document’s border.
Step By Step: Using the Embosser
Once you have settled on the right thickness of paper and a suitable location, you are ready to place your Washington notary seal embosser on the page. Follow these steps for consistent, professional results:
- Position the Paper
Slide the document into the embosser so that the die plates contact the exact location where you want the impression. If your device has an orientation mark or built-in guide, use it to align the paper and keep the impression straight.
- Apply Steady Pressure
Grip the lever firmly and apply pressure in a smooth, controlled motion. You want to press hard enough to form a crisp raised impression, but not so forcefully that you tear the paper or damage the embosser.
- Release Gradually
Release the lever slowly, allowing the plates to separate from the paper. This helps keep the design crisp and prevents partial embossing.
- Check the Impression
Inspect your seal for clarity. If the design appears faint or partially indented, realign the paper and try again with slightly firmer pressure. If you see any signs of tearing, you may need lighter pressure or a thinner paper. Remember that practice makes perfect. Testing your embosser on a few sample sheets helps you get a feel for the amount of pressure needed for your specific device.
Common Pitfalls and How to Avoid Them
Even seasoned notaries occasionally run into problems that result in blurry, incomplete, or off-center impressions. Here are some common pitfalls and tips to help you avoid them.
Off-Center or Crooked Impressions
- Check the Orientation Guide: Use the orientation mark on your embosser if available.
- Practice on Mock Documents: Doing a quick trial run before embossing the final paperwork reduces any chance of mistakes.
Insufficient Pressure
- Apply Firm, Even Force: Build up consistent pressure until the design is fully transferred.
- Watch Thick Paper: If you need to emboss heavier paper for legal documents, be extra attentive to pressure.
Faint or Incomplete Design
- Realign the Document: The paper may have shifted during embossing.
- Press the Lever Smoothly: A fast, jerky motion can lead to faint spots.
Tearing the Document
- Reduce Force: Too much pressure can puncture delicate or low-quality paper.
- Use Quality Paper: Upgrading to a slightly heavier bond paper can prevent tears.
Addressing these issues quickly helps you maintain the professional look your clients expect from your notarial services.
Maintaining Your Washington Notary Seal Embosser
Proper maintenance ensures you get many years of reliable use from your embosser. Regular care keeps the plates in pristine condition and prevents any debris from affecting the clarity of your impressions.
Cleaning the Dies
- Soft Brush or Cloth: Gently remove dust or any small particles that might collect in the raised areas of the die.
- Avoid Harsh Chemicals: Most metal die plates can be cleaned with a mild cleaner or simply wiped with a damp cloth.
- Inspect for Debris: After each cleaning, make sure no tiny fibers or dirt remain that could mar the next seal.
Safe Storage Practices
- Protective Case: Storing your embosser in a dedicated case keeps dust and moisture away, which can corrode the metal over time.
- Avoid Extreme Temperatures: Protect the device from direct sunlight or excessive heat. Metal parts can expand and negatively affect alignment.
- Secure Location: Since your Washington notary seal embosser carries legal significance, keep it in a locked drawer or cabinet when not in use.
About Acorn Stamps
If you are looking for a reputable supplier of Washington notary stamps and Washington notary seals, Acorn Stamps is a trusted name. We have been family owned and operated since 1964, proudly serving notaries in Washington and across the country for 60 years. Our reputation for stellar customer service stems from our dedication to delivering products of the highest quality with super fast turnaround.Acorn Stamps offers:
- Wide Selection of Embossers: Various handheld and desk embosser models that align with Washington’s specific guidelines.
- Durable Materials: Sturdy metal construction designed for repeated, high-volume use.
- Customization: Imprint precisely matches your name and commission details.
- Support and Guidance: We are always ready to answer questions to ensure you get the most out of your embosser.
Choosing a top-quality embosser from a trusted source such as Acorn Stamps makes notarizing documents smoother and more professional for you and your clients.
Summary and Best Practices
Using a Washington notary seal embosser may feel like a small part of your role, but it adds a level of authenticity and gravitas to the notarial act. By mastering your seal placement, applying the right amount of pressure, and keeping your embosser well maintained, you can confidently deliver reliable and professional notary services.
- Test Your Embosser: Practice on scrap paper to find the perfect pressure.
- Keep It Straight: Align your seal carefully for a neat, centered impression.
- Optimize Paper Choice: Stick to standard or premium bond paper for crisp results.
- Store Properly: Clean and protect your embosser to prolong its life.
- Rely on Quality: Choose a trustworthy supplier, such as Acorn Stamps, for the best materials and support.
Following these tips does not just safeguard your professional image. It also helps ensure you meet or exceed the standards set by Washington for notarial acts.
Frequently Asked Questions
Can I Use a Rubber Ink Stamp Instead of an Embosser in Washington?
You can typically use either a rubber ink stamp or a notary seal embosser if it meets Washington’s regulations. However, be aware of any state guidelines that specify size, design, and legibility. Many notaries appreciate the elevated look and tamper-resistance of an embossed seal.
What If My Embossed Impression Looks Faint or Unclear?
First, double-check your pressure and alignment. If your hand strength is limited, a desk-style embosser might be easier to press evenly. Also consider the thickness and texture of the paper. Try switching to a slightly heavier bond paper for clearer results.
Do I Need a Specific Placement on the Document for the Embossed Seal?
Yes. Washington generally requires your notary seal be close to the notary’s signature and easily visible on the page. Always avoid covering text or signatures. When in doubt, leave some extra margin for both the seal and the notary certificate.
How Do I Clean and Maintain My Notary Seal Embosser?
Gently brush away any dust or particles in the design. Wipe with a soft, damp cloth to remove residue, and avoid harsh chemicals. Store your embosser in a protective case in a cool, dry spot to keep the metal dies aligned and rust-free.
When Should I Replace My Embosser?
If your current embosser no longer aligns properly, shows signs of wear that affect legibility, or has become damaged, it is time to replace it. After renewing your commission, it is also a good idea to check that your device meets any updated state requirements. A high-quality embosser from a trusted supplier like Acorn Stamps can last many years.
With these best practices and tips in mind, you are all set to use your Washington notary seal embosser like a pro. The more you use it, the more comfortable and efficient the process will become. By choosing top-tier supplies from Acorn Stamps and caring for them routinely, you will be ready to notarize documents with confidence and precision for years to come.